Sunday, November 30, 2008

NEW SCRAPBOOK STENCIL SYSTEM


You Can Get Three Sample Stencils Absolutely FREE!

Here is a great new Scrapbooking Tool that puts more of "You and Your Talent" into your work and creations. Now you DO NOT have to search the Craft Shops to find just the right stamp or sticker to blend with your scrapbook ideas. You can create your own Designs or Artwork that smoothly carry your theme through your entire scrapbook. You can easily do this and you will be thrilled with the results. It is easy to do and much more Satisfying when your pages flow smoothly with your own ideas and creations and are not "Choppy" because you had to "Make Do" with a craft shop sticker or rubber stamp.

You won’t be wasting time searching the internet or craft shops for the PERFECT STENCILS. Now you can make them in minutes for just pennies. Make your scrapbook a precious memory that will reflect your innermost feelings, desires, and emotions to bring pleasure to your family and friends for decades.

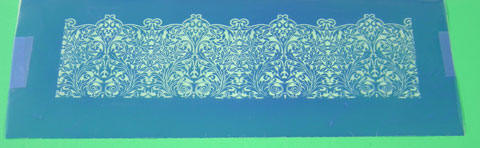
It is quick and easy to make these new stencils. You simply use your own designs or artwork with your computer and in just minutes you can create Stencils that perfectly express exactly the theme you want to use in your scrapbook. And since you can re-use them hundreds of times, the cost per use is less than pennies!

There are no limits to the artwork you can create when you use these new Stencils and You don’t have to be an artist to make them. Here is a summary of How EASY the process is. First, Create your Copy, Design or Artwork on Your computer. You can even use Clip Art or any un-copyrighted designs you find on the internet. Then Print the design in Black Ink onto a Transparency which comes in each kit.

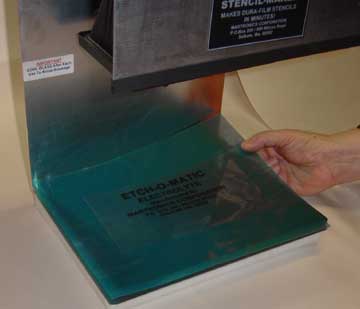
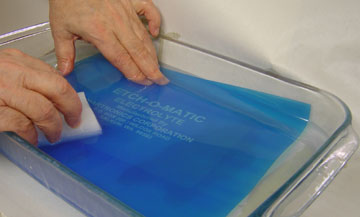
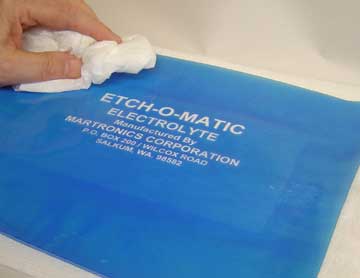
Next Place your transparency directly on an undeveloped stencil. Simply put your Transparency and your Unexposed stencil into the exposure unit. Turn the unit on, set the timer and expose the stencil for 2 to 3 minutes. After the short exposure simply take out the exposed stencil and develop it for about 2 minutes. That is all there is to it. Notice you do NOT have to Cut out the stencils with an X-Eacto Knife. Your computer does the whole job and makes a perfect stencil every time. Nothing could be easier.

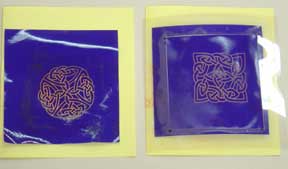
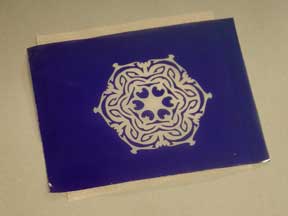
Also you should know these Same stencils can be used to Permanently Etch Metal, Glass, Porcelain, and Ceramics. With Acrylic Paint or Ink you can paint on Fabrics, Leather, T-Shirts, Tote Bags, Wood, Paper, Poster Board, Plastic or Anything that will take paint or ink. This opens up a world of artistic craft opportunities for your FUN and possibly PROFIT!


There really is no limit to the items (and memories) that you can put into your scrapbooks. These New Stencils can help capture feelings and emotions as well as tell more of your overall story. So take a quick peek at the photos on the website below and ask for your Three FREE Sample Stencils, Today!

http://stencil-maker.com/scrapbooking-stencils.htm

Saturday, November 29, 2008

Have Fun With New FREE Acrylic Paint Stencils!


Have You Ever Wanted To Put Your Own Artwork, Designs, Ideas or Text Copy on Glass, Wood, Fabric, Metal, Plastic, Paper or Any Other Material?

Now You Can - And it is Quick, Easy, Fun and Very Inexpensive! Here is how you do it with a New Universal Stencil Kit that lets you Etch, Paint or Print on almost anything.

Use your computer to create any Design you want to put on any material. Once you have the design or artwork on your computer, print it out on a transparency sheet (included in the kit) and use that transparency with one of the New Stencil Maker Kits to make a finished Universal Stencil which you can use with Water Based Acrylic Paint to put your creation directly on any material that takes paint or ink. (Special Note: You can also use them with Glass etching cream to permanently etch your designs or artwork on glass in seconds.)

It is that simple and takes only about 5 minutes to make a stencil which can be used hundreds of times and can be used on Glass one minute, on Metal the next minute, and then you can switch to painting Wood, Fabric, Plastic, Paper or anything else in just minutes. This is New and there’s nothing like this available on the Internet Today. Take a few minutes and you will see how Easy it is to Make and Use these new Universal Stencils. You will see how to make a stencil in minutes and how you can use your Stencils in Thousands of ways on Hundreds of different Materials or Projects.

Now you can simply "Go Wild" with these Stencils and let your unlimited Artistic Talent and Ideas flow and create all the Great Ideas that you have put aside because they would take to long or you couldn't take the time to find just the right stencils or artwork to finish the project.

Best of all, you do NOT have to Cut Out your stencils anymore with a razor blade or X-Excto knife. That is the Old Way. Now your computer does it all for you and you can make even the most intricate stencils you can ever imagine in just minutes and they will always be perfect and follow your artwork or designs easily. (Note: You do NOT need to buy any software to make these stencils, just use your own software already in your computer.)

There you have it...A New Stencil Making System that will open up a world of Fantastic New Possibilities for you and allow you to use Your Talent and Creative Ideas to have a lot of Fun and make some real Money if you so desire. You are limited only by your own Imagination and Energy. So now is the time to let your Artistic Ideas flow and enjoy creating things you have put off before as too much work....especially if the artwork had to be repeated or was quite complicated. This new system cuts through all of that and frees you up to "Multiply" yourself if you are creating any item or artwork that needs to be "Produced" in quantities.

Now you can relax and really enjoy your Crafts knowing that you are saving Time, Money and lots of Work using these New Stencils and also knowing that many New Ideas are now open to you. So take a few moments and investigate these new easy to use stencils and consider all of the ideas that you can easily use them for.

Now here is the best part. You can get Three Absolutely FREE Stencils to try by simply "Checking out" the website below. http://www.stencil-maker.com/acrylic-paint-stencils.htm There is nothing to buy and “No Catch" to it. You simply ask for them and they are yours Free and postage paid.

Holiday Special: Get your free stencils along with a Glass Photo Keepsake kit (Special Price for these hard economic times) for the Holidays – the beautiful ornaments with your special family photos will be treasured for years to come. The kit has everything you need from the photo paper, transparencies, UV Glass Glue, six assorted glass ornaments to the Special 160 Watt Ultra-Violet Curing Unit. http://www.glass-etching-kits.com/new_glass_pictures.htm

Wednesday, November 26, 2008

Give Cherished Memories To Loved Ones At Christmas


Treasured Heirlooms
Everyone loves cherished family photos, so why not give them as gifts? Personalized photo gifts are a great way to introduce thoughtfulness into your gift giving this year. You make these personalized photo gifts yourself which adds to their appeal. Photo gifts last forever and never lose their meaning. They become treasured heirlooms.

You can make beautiful Photo Christmas Tree Ornaments using family photos in just minutes for pennies. These special ornaments will bring warmth and love to all you send them to and help to bring home the true family spirit of Christmas. Just imagine your tree hung with Christmas ornaments each bearing a cherished family photo of good times, fun times and personalized photos of parents, children, grandchildren and even of those who have passed on. Here is really what it all comes down to. Family, loved ones and Christmas all together and sharing a beautiful moment together.

Here is a wonderful new idea of putting cherished family photos on Christmas tree ornaments. It is simple, fast, easy to do, very inexpensive and you can do it in just minutes. And the results are beautiful and will be enjoyed by everyone. Why not consider exploring the idea of making and giving photo Christmas tree ornaments this year.

Don't you just love the holidays? The part I love best is getting together with family and friends. Our family takes lots of photos. Aside from putting them in the family photo album and posting them on myspace or facebook what do you do with them? Put them on Christmas Tree Ornaments!

Yes, that's right. And I'm not talking about cutting them out and gluing them on. That looks so bad. No, I mean you FUSE them onto glass ornaments. They become beautiful permanent ornaments.

It's really very easy. You can do it and it is FUN!

The new Do-It-Yourself kit that has everything in it you need to make all the Christmas ornaments you want. You supply the Photos and a little of your time and in a short time you will make beautiful ornaments that your family will simply adore and they do NOT look hand made. They look professional and can be used Christmas after Christmas and will remind everyone of your thoughtfulness year after year.

This easy to use kit contains everything necessary to quickly fuse your best photos to glass:
~~Flat glass ornaments in various shapes (that make it very easy to add photos)
~~photo paper
~~transparency sheets
~~special Ultra-violet exposure unit
~~U.V. glue that fuses photos to glass in minutes
~~electric timer

The holidays do tend to sneak up on us. Before you know it, all your plans to make handmade gifts are out the window because you've run out of time. Personalized photo gifts are an option even at the last minute. Making personalized glass photo gifts is simple and only takes a few minutes. Your biggest challenge in making personalized photo gifts will be deciding which adorable photos you'd like to showcase.

Ultimately, when choosing a gift for a loved one, price is usually the deciding factor. We'd all love to spend a fortune on gifts around the holidays, but not everyone has that option.

For more information and ideas visit us at Photo Ornaments.

Make your own stencils for family crafts at stencil-maker.com


Martronics Corporation has been in business for over 41 years in the Pacific Northwest
Specializing in everything you need to make your mark.

Sunday, October 26, 2008

Great Holiday Gift - Photo Ornaments


The holidays do tend to sneak up on us. Before you know it, all your plans to make handmade gifts are out the window because you’ve run out of time. Personalized photo gifts are an option even at the last minute. Your biggest challenge in making personalized photo gifts will deciding which adorable photo you’d like to showcase.

Making personalized glass photo gifts is simple and only takes a few minutes.

Ultimately, when choosing a gift for a loved one, price is usually the deciding factor. We’d all love to spend a fortune on gifts around the holidays, but not everyone has that option. Personalized photo gifts are affordable. The materials to make personalized photo ornaments cost just a few dollars per gift. At that price, you can afford to give everyone in your family a photo ornament at the holidays. 

Personalized photo ornaments and gifts are the solution to your holiday gift-giving dilemmas. They’re fun and easy to make. Not to mention, handmade photo ornaments are kind to your gift-giving budget.

Most importantly, photo ornaments are personal. Every year, when your loved one hangs your personalized photo ornament on the tree, they’ll think of the thoughtfulness and effort that went into the making of that gift. They will remember the moment the photo was taken and enjoy the memory of that photo throughout the holiday season. Socks might be a more functional gift, but they don’t last forever. Personalized photo gifts and ornaments bring joy year after year.

DIY Craft Stencils


Do you ever look at other’s handmade, craft stenciled cloth bags, t-shirts or other creations and think, “I can do that!” You definitely can. Anyone can create fun, personalized stenciled crafts in no time at all. They make great gifts and an even better way to demonstrate your interests and personal style.

The trouble is, when you go to craft stores, they never seem to have the stencil that you want. The craft stencil collection usually leaves a little bit to be desired.

If you have a specific message that you’re looking to create, sometimes you even have to purchase individual alphabet stencils. They almost never have all the letters you need in the font that you want. If they do, you have to work overtime to ensure that your message is stenciled on straight without them looking like a jumbled mess.

Sure, you can always paint your messages, logos and designs free handed. But unless you have some natural artistic talent—and not everyone does—your painted craft might not turn out exactly how you’ve envisioned it.

Luckily, you can create your very own craft stencils right in your own home. It’s quick, easy, and better yet, you always end up with the exact stencil you want.

How do you make your own craft stencils? Affordable do-it-yourself kits make it possible for you to create stencils at home that are ready to use in minutes. You can use these stencils over and over again to personalize items in a number of ways.

  1. Simply create your stencil design on the computer using design software. 
  2. Print the design onto transparency so that you can use to make your stencil. 
  3. With your easy to use stencil maker, transfer the design to durable film stencil material. 
  4. The stencil maker cuts the design for you, allowing you to create intricate stencil designs without the frustration of cutting them yourself.

In just a few moments, your stencil is dry and ready to go. Because you used durable film stencil material, you can use the same stencil over and over again to stencil painted images and text on an endless numbers of bags, t-shirts, or any cloth material you can get your hands on.

These durable stencils can also be used with tougher design transfer techniques like metal and glass etching. You might think that metal and glass etching would ruin your stencil. But the right craft stencil material can ensure that your stencil will help produce many different stenciled crafts. Tough stencils save you time and money. 

Do-it-yourself stencil making kits help you create hundreds of different personalized crafts that you could never do by hand. Create uniform copy that says exactly what you want. Stencil beautiful designs and logos without the time and frustration of trying to draw them yourself.

Making your own craft stencils can produce beautiful personalized wardrobe pieces and gifts that you and your family will love. Crafts and gifts that are handmade are always more special than anything you could buy in a store. 

Wednesday, May 23, 2007

How To Etch Glass With Your Own Designs

Watch The Quick Glass Etching Video To See How To Etch Glass With Your Own Designs.

Tuesday, May 08, 2007

DIY Network Featured Sign-O-Matic


The Sign-O-Matic was featured on National TV just last year. The DIY Network has the Video and Article, found at the link below:

Make Custom Stencils

We just put together a new video explaining the Sign-O-Matic Sign and Label Maker! You can see how easy it is to make your custom stencils.

Thursday, April 20, 2006

The Basics--How To Create The Stencil

For our first post, we're going to stick with the basics so that you can refer back to this page whenever you need to be reminded how simple it is to create the Dura-Film Stencils. These stencils are going to be used over and over again in order to create everything from etched metal and glass, to stamped scrapbook pages. That's right, same stencil.

Step One: Create Your Artwork

Here's just one example of a piece of artwork we created using a Photoshop specialty brush. You can use any line art at all that you can create on your computer. The only requirement is that the picture use only 100% black color. No shading or other colors (you'll add that stuff in later with paint, if you want).


Step Two: Print To A Transparency

Whatever your artwork or text, just print it on to a transparency with your regular old printer. If your printer lets you set the print quality, set it to Best Quality, and More Ink. If your printer doesn't let you set those things, then don't worry about it.


Step Three: Expose Transparency Using UV Stencil Maker

Place the transparency over the top of the blue-green stencil material. Place it in the Stencil Maker, cover it with the glass plate, and expose it for 2 minutes.


Step Four: Peel The Backing

The stencil has a thin clear backing on BOTH SIDES. You'll need to remove both pieces in order for the developer to work. Simply separate the clear backing from the blue stencil at a corner, and peel it apart.


Step Five: Develop The Stencil

Place the stencil in a pan of developer. The container needs to be wide enough that you can fit the whole stencil under the developer liquid at once. Use a sponge to gently wipe away the unexposed parts of the stencil. This will be the part that will etch. As the stencil develops, you will see the light parts getting even lighter, and you will be able to feel the light parts get slightly rough. When all of your design feels rough and looks evenly light, take the stencil out of the developer and hold it up to the light. If you can see any dark spots, place in developer and sponge a bit more.


Step Six: Wash And Dry The Stencil

Once the stencil is completely developed, wash all of the developer fluid off of the stencil under running water. Use a paper towel to dry the stencil. If you're going to use the stencil right away, you might want to use a blowdryer to get the stencil completely dry.


Step Seven: Enjoy Your Stencil!

Heres a couple examples of stencils we've made recently. Soon to follow are instructions for the projects where we actually used those stencils, and lots more!